Note : Sizes are not exact - your measurements may vary - this is a guide ONLY

IguanaWORLD Habitat - Step 2 (Lighting Unit)

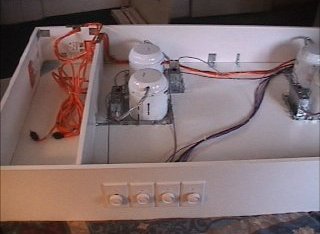
Description: Internally reinforced, melamine sheathed overhead structure measuring 10" high x 3' deep x 6' wide housing all the electrical and lighting units for IguanaWORLD. Built essentially the same as the base unit in the previous step.

Material List:

Qty Size Description Usage
2 3/4"x10"x36" Melamine Shelving Overhead Sides
2 3/4"x10"x72" Melamine Shelving Overhead Front/Back
2 3/4"x8"x36" Melamine Shelving Inside Braces
4 4" Triangle Corner Braces Top Corners
4 3" Triangle Corner Braces Bottom Corners
18 2" "L" Brackets Used on Inside Braces
1 3/4"x36"x72" Melamine Sheet Overhead Sheathing
1 Tube White Silicone Caulk Waterproof all Seams
1 Box #8x3/4" Wood Screws (Zinc Coated) Fasteners

Electrical List:

Qty Size Description Usage
4 8" Halo Recessed Lighting Fixtures 150watt min
4 8" Halo Trim Kits Trim Kits
2 16' Heavy Duty Extension Cords Outdoor Only
1 100' Roll 16AWG Hookup Wire Hookup Wire
2 Outdoor Heavy Duty SPST Timers Metal Cased
4 N/A Dimmer Switches For Temp Control
1 N/A Bag (16AWG Wire Nuts) Wire Nuts
2 24" Undercounter Flourescents UVA/UVB Source
2 24" ESU 7% UVA/UVB Bulbs UV Source
2 N/A 150 Watt White Basking Lamps Heat/Day
2 N/A 150 Watt Red Lamps Heat/Night

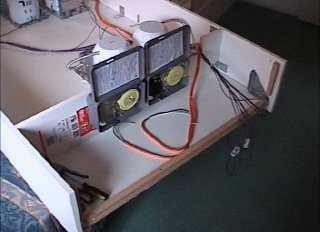
Tools Needed: 1 Power Screwdriver, 1 Circular Saw, 1 Jigsaw, 1 Utility Knife


Note: If you follow the pictures above, you should end up with a 1" lip all the way around the inside of the overhead lighting unit. Caulk this well. Like the base unit, it will be used later as an attachment point for the sidewalls and back panels. Everything goes together just like the base unit did. The exception is the internal braces. Make sure they will clear the placement of the lighting units once installed. The timers are the heavy duty outside ones found at Home Depot. They run about 40.00 apiece but their heavy duty construction allows me to sleep better at night. Everything is hard wired.

I used some leftover oak trim to make the end panel (1) removable. You can use hinges if you want, however your going to change the timer settings so infrequently, that I used screws. If I ever have to change things, a second with a power screwdriver is all I need to concern myself with. (see the last picture in the set above)

For those of you interested, here is a quick overview of the electrical wiring that makes up the lighting and how it was installed - Click Here!


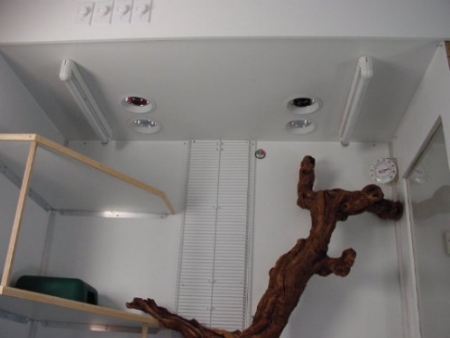
Construction Time : About 2.5 hours

GO TO THE ELECTRICAL LAYOUT

HOME - BASE - TOP - ELECTRICAL - SIDES - BACK - WINDOWS
SHELVES - FRONT - DOORS - FINAL ASSEMBLY


All comments and suggestions should be directed to vze2372e@verizon.net
This Website Courtesy of Coldwater Solutions, Copyright 2000-2001

Lizardcages.com Big cages for Big Lizards